Wednesday 27 February 2013

Pressure Cooker Chicken Curry

Another snowy day calls for another simple warm comfort food. This chicken curry is great because it uses ingredients that we keep in the house, and it can be made in the pressure cooker, so a total of about 45 mins from start to finish including prep time. An added bonus is that the leftovers can be easily packed up for lunches tomorrow.

This was a meal intended for everyone, so I followed the recipe without adding any extras to keep it at a mildly spiced level. Hubby added some hot curry powder to his serving to give it more kick, and for the kids I just served them the chicken pieces with a little sauce since they're not fans of cooked tomatoes or onion. And they definitely don't like their ingredients all mixed together. I ate my portion on sticky rice. 
 
 
Pressure Cooker Chicken Curry
Adapted from Yummy Tummy
  • 3 tbsp vegetable oil
  • 2 tsp fennel seeds
  • 2 large onions, thinly sliced
  • 2 tbsp ginger garlic paste (or 1 tbsp each of grated ginger & garlic)
  • 1/2 tsp salt (or more or less, to taste)
  • 1 tsp turmeric powder
  • 2 tsp chili powder
  • 2 tsp garam masala 
  • 1 sprig curry leaves (or 2 dried bay leaves) 
  • 4 finely chopped tomatoes, or ~1 1/2 cups canned tomatoes 
  • 1 lb boneless skinless chicken, cut in 1-2 inch chunks (I prefer thighs for curry)
  1. Heat oil in your pressure cooker pot. 
  2. Add fennel seeds and heat until they crackle, it should take less than a minute if your oil is hot enough. 
  3. Add onions and saute for 5 mins, stirring. 
  4. Add ginger garlic paste and mix well.
  5. Add salt and all the spice powders and mix well. (I like to measure these out ahead of time so that I can just dump them all in at once.)
  6. Stir in tomatoes and curry/bay leaves and cook until the tomatoes have softened. 
  7. Stir in the chicken pieces. 
  8. Close the pressure cooker, heat to pressure, and then cook for 15 minutes. Use the natural pressure release method and let sit off the heat/unplugged. This should take about 10 minutes.
  9. Serve with rice, potatoes or roti.

Sunday 24 February 2013

Lentils in Tomato & Polenta

Since getting my pressure cooker I've been making more legume dishes for weekday dinners because I can cook them up much more quickly than on the stove top or oven. There are a ton of great recipes at Hip Pressure Cooking's blog which have so far all turned out perfectly, and their lentil recipe is no exception!


This recipe has led me to discover that my kids actually like lentils! Go figure. I had assumed the kids wouldn't like them so never bothered to try. And because it's cooked efficiently, the flavors stay fresh and bright. Polenta is a side dish loved by all of us that goes really well with the lentils. I serve it warm for dinner, and then I let the leftover polenta set in a parchment paper-lined pan. 

After dinner, I assemble the leftovers into square lunch containers, layered lasagna-style. I put some lentils into my container, followed by a layer of sliced polenta, and repeat until I have a good serving size, ending with lentils so that the polenta doesn't dry up. It's great either cold or microwaved.

Lentils in Tomatoes --Pressure Cooker Recipe

  • olive oil
  • 1 medium onion, chopped
  • 1 stalk celery, chopped 
  • 1 medium green pepper, chopped
  • 14.5oz can of chopped tomatoes (~1.8 cups or 430ml)
  • 1 tbsp curry powder
  • salt & pepper
  • 1 heaping cup of green lentils
  • 2 cups water
  1. Preheat the pressure cooker, add a splash of oil, and saute the onion, celery and green pepper.
  2. When the veggies are softened, stir in the can of tomato, curry powder, and salt and pepper to taste.
  3. Stir in the lentils and water.
  4. Close and lock the lid, cook for about 15 minutes once pressure is reached. Time will vary depending on the lentils, apparently smaller lentils take longer to cook, but mine are always ready in about 15 minutes and they're what I'd consider standard sized green lentils (if there's such a thing!).
  5. When the time is up, use the natural release method to open the pot which takes about 10 minutes. (Turn off the electric pot, or remove the stove-top pot from the heat).
Polenta

  • ~4 cups chicken broth (this will vary depending on the coarseness of your cornmeal)
  • 1 cup cornmeal
  • 1 tsp salt (if using low/no sodium broth)
  • 1 tbsp butter
  • a handful of fresh grated Parmesan, Romano, or other similar cheese.
  1. Bring the broth to a boil.
  2. Slowly whisk in the cornmeal, reduce heat to low.
  3. Simmer, stirring frequently, until the mixture is thickened and the cornmeal is tender, about 15 minutes.
  4. Turn off the heat, add butter and cheese, and stir until melted. 

Saturday 23 February 2013

Green Day

It's a cold, damp, cloudy Saturday afternoon and half of our family has a bad case of the fevery sniffles. A perfect day for hubby to surprise us all with a few brand new healthy recipes made in our brand new blender! Today's green menu included Creamy Spinach Avocado Soup and Popeye Ice Cream.

One great feature of the blender is that it can blend so quickly as to actually heat up soups. Veggies out of the fridge with cold water out of the tap resulted in steamy soup in a single step! The texture of the soup was very smooth and creamy, the flavors blended together beautifully, and it was very, very garlicky (which is never a bad thing when you have a bad cold!). If you don't have a comparable blender I'd imagine that you might be able to use a good food processor to blend everything together and then heat on a stove top, but I haven't tried that yet.

For desert, hubby used another option on the blender to make some one-step ice cream. The blade spins more slowly on this setting in order to blend the ice with a minimal amount of melting. A main ingredient in the ice cream is fresh spinach which made it a vibrant green color! Other than for the color I wouldn't have guessed that there was anything different in the homemade ice cream than the traditional ingredients of vanilla ice cream. The kids called it 'icy green slime' and loved their portions!


These recipes are adapted from the BlendTec cookbook.

Creamy Spinach Avocado Soup


Makes 2 large bowls of soup


Ingredients:
  • 1 1/2 cups water
  • 2 cups spinach
  • 1 avocado
  • 1 stalk celery
  • 1 tsp cumin
  • 1 tsp dry red pepper flakes
  • 2 cloves garlic
  • pinch salt
Blend all ingredients until steamy on the Soup setting. Garnish with additional chopped spinach, mushrooms or red peppers.


Popeye Ice Cream


Ingredients
  • 1/2 cup cream, half and half, milk or milk substitute
  • 1 scoop protein powder
  • 2 tbsp honey (or sweetener of choice)
  • 1 cup spinach
  • ½ tsp vanilla
  • 4 cups ice
Place all ingredients into the blender in the order listed and secure lid. Blend on the Ice Cream setting. Serve immediately or store in freezer.

Tuesday 19 February 2013

General Tao Chicken

What's your favorite Chinese take-out dish?

At our house General Tao's Chicken is loved by all. Now that I've learned how to make saucy crispy chicken (Lemon Chicken) and have the ingredients on hand to spice things up (Pad Thai), I figured it was a good time to go searching for a great General Tao's chicken recipe.

And I didn't just find a great recipe, I found a great recipe on a blog that is coincidentally running a contest that involves cooking the dish and then blogging about it! And here I am with a baby blog that's not even a month old, and itching to cook up some General Tao's Chicken! I love coincidences. And I love free stuff.  But even more importantly I loved the fact that I was participating in a 'Virtual Potluck' in celebration of Chinese New Year and of blogger Diana Kuan's new The Chinese Takeout Cookbook.

Now the contest rules don't say that I need to give the recipe a positive review, just that I need to cook it, take a snap of it, and blog about it. But here's the thing, it was an absolutely awesome dish! The flavors came out perfectly with the just the right balance of sweet and tangy with a mild level of spiciness. The recipe was so clear that my two kitchen helpers were able to measure out and mix all the ingredients without any issues. And the chicken turned out incredibly crispy before saucing it up.

It took us about a hour from start to finish to make the recipe, not rushing, since it was the weekend.  It could have been done in about half the time if I had prepped the marinade, sauce and chicken in advance, which makes it a reasonable meal for a weekday as well. Here's the yummy recipe that we followed with no changes (except that I used a regular stainless steel frying pan rather than a wok).


General Tso’s Chicken (or General Tao's Chicken)
by Appetite for China

Serves 4 as part of a multi-course meal, 2 to 3 as a main entree
  • 1 pound boneless, skinless chicken thighs, sliced into 1-inch cubes
  • 1 1/2 cups cornstarch
  • 1/2 teaspoon salt
  • 1/2 teaspoon freshly ground black pepper
  • 3 cups peanut or vegetable oil for frying, plus 1 tablespoon for stir-frying
  • 8 dried whole red chilis, or substitute 1/4 teaspoon dried red chili flakes
  • 2 cloves garlic, minced
  • 1 teaspoon white sesame seeds, for garnish
  • Scallions, green parts thinly sliced, for garnish
Marinade:
  • 1 tablespoons soy sauce
  • 1 tablespoon Chinese rice wine or dry sherry
  • 2 egg whites
Sauce:
  • 1/4 cup chicken stock, or substitute water
  • 1 1/2 tablespoons tomato paste
  • 1 tablespoon soy sauce
  • 1 tablespoon rice vinegar
  • 1 teaspoon hoisin sauce
  • 1 teaspoon chili paste
  • 1 teaspoon sesame oil
  • 1 tablespoon sugar
  • 1 teaspoon cornstarch
  1. Prepare the marinade: In a large bowl, combine the soy sauce, rice wine, and egg whites. Coat the chicken to the marinade mixture and let sit for 10 minutes.
  2. Prepare the sauce: In a small bowl, combine the chicken stock, tomato paste, sugar, soy sauce, rice vinegar, hoisin sauce, chili paste, sesame oil, sugar, and the 1 teaspoon of cornstarch. Stir until the sugar and cornstarch are dissolved. Set the sauce aside.
  3. In a large bowl or deep plate, toss the 1 1/2 cups cornstarch with the salt and pepper. Coat the marinated chicken in the cornstarch and shake off any excess before frying.
  4. Heat the 3 cups of peanut or vegetable oil in your wok until it registers 350°F on an instant-read oil thermometer. Working in 2 or 3 batches, add the first batch of chicken cubes and fry until golden brown on the outside and cooked through, about 4 to 5 minutes. Remove the chicken with a slotted spoon and drain on paper towels. Repeat with the rest of the chicken.
  5. Drain the oil into a heatproof container and save for discarding. Wipe the wok with a paper towel to remove any brown bits, but don’t wash.
  6. Reheat the wok or skillet over medium-high heat. Add another 1 tablespoon of oil and swirl to coat the base and sides. Add the dried chilis and garlic to the wok and stir-fry until just fragrant, about 20 seconds. Pour in the sauce mixture and stir until thickened, about 1 to 2 minutes.
  7. Return the chicken to the wok and stir well to coat with sauce. Transfer the chicken to a serving dish. Garnish with white sesame seeds and scallions. Serve with white rice and vegetables.

Thursday 14 February 2013

Lemon Chicken, Chicken Fried Rice & a Green Smoothie

Our special dinner tonight was lemon chicken with chicken fried rice. A take-out meal cooked at home that was simple and yummy! And to not be neglectful of our fruit and veggie needs I made us all smoothies for dessert with my brand new Valentine's day gift, an awesome blender! Awesome because it seems to be able to blend anything including Justin Bieber paraphernalia (which I will not be trying at home), and awesome because I blended spinach into our banana and berry mixture and the kids loved it!

Lemon Chicken
adapted from CDKitchen

For the chicken
  • 6 chicken breast halves, deboned and cut into bite size pieces 
  • 1/2 cup cornstarch 
  • 1/2 teaspoon salt 
  • 1/8 teaspoon pepper 
  • 1/4 cup water 
  • 4 egg yolks, beaten 
  • 2 cups cooking oil 
  • green onions, sliced

  1. Combine cornstarch, salt and pepper. Blend in water and egg yolks. 
  2. Dip chicken pieces into cornstarch-egg mixture. 
  3. Fry chicken in oil for about 5 minutes until golden. Drain. (I cook it in a few batches)
  4. Sprinkle with green onions. 
  5. Pour sauce over (most of the) chicken. If you have family members who don't like lemon sauce, the chicken recipe is also good served on its own as popcorn chicken or chicken nuggets.

And for the lemon Sauce

  • 1 1/2 cup water
  • 1/2 cup lemon juice
  • 3 1/2 tablespoons brown sugar
  • 3 tablespoons cornstarch
  • 3 tablespoons honey
  • 2 teaspoons chicken bouillon granules
  • 1/4 teaspoon ginger, or more if desired
  1. Combine all the ingredients in a saucepan. 
  2. Cook over medium heat, stirring, about 5 minutes until sauce boils. 
  3. Pour over chicken.

Chicken Fried Rice
adapted from Iowa Girl Eats
  • 2 cups prepared rice (if it's freshly cooked, I like to spread it out on a baking sheet to cool off & dry out a bit while I'm prepping the ingredients so that it doesn't get mucky.)
  • 1 chicken breast, cut into bite-sized pieces and seasoned with salt & pepper 
  • 1 cup frozen mixed vegetables (I like peas and corn and fresh broccoli)
  • 2 green onions, chopped
  • 1 clove garlic, minced
  • 1 egg
  • sesame or vegetable oil
  • 2 tablespoons soy sauce
  1. Whisk egg with 1 teaspoon of oil in a small dish then set aside.
  2. Heat 1 teaspoon oil in a large wok or skillet over medium-high heat. Add seasoned chicken then stir fry until cooked through and remove to a plate. (If using pre-cooked chicken, skip this step.)
  3. Heat another teaspoon oil in the wok then add frozen mixed vegetables and green onions. Stir fry until tender, about 2 minutes, then add garlic and cook for 30 more seconds. Push vegetables to the side of the wok then add egg and sesame oil mixture into the center and scramble.
  4. Add cooked chicken, rice, and soy sauce to wok then toss well to combine.

Banana Berry Green Smoothie
Add ingredients to the blender in this order & blend until smooth.
  • 1 peeled banana
  • 3/4 cup water
  • 2 large handfuls of fresh baby spinach
  • 1 cup frozen berries

Wednesday 13 February 2013

Pad Thai

One of my cooking goals this year has been to take dishes that we'd typically order from a restaurant and figure out how to make them at home. Pad Thai is one of those dishes that I'd only ever eaten out, so I took on the task of researching how best to make it. So far it's been the recipe that I've put the most time into researching because there doesn't seem to be one single best accepted way of making it among internet recipe posters.

Some recipes that claimed to be Pad Thai didn't seem remotely close to what I expected and were just a simple veggie stir fry with soy sauce. Others incorporated ketchup into their veggie noodle-y creations and that just didn't sound right to me. Finally after a lot of searching I stumbled on an awesome and comprehensive article on how to make an authentic Pad Thai. One excellent recommendation was to make the sauce ahead of time in order to find the right balance of sour, salty, spicy, and sweet flavours and a few options were given for ingredient choices.

So equipped with notes from the article, I set out on a trip to the local Asian supermarket.  I'd only been there once or twice before to browse and never with a specific grocery list, especially a grocery list of ingredients that I'd mostly never purchased before. I seriously spent about 45 minutes trying to figure out where to find most my ingredients until I caved and started asking clerks for help. Who knew that fish sauce wouldn't be in the same spot as oyster sauce, or that rice stick noodles wouldn't be in the noodle aisle? Or that peanuts would be in the bulk aisle rather than in the 'nuts and snacks' aisle? Even when I did find the ingredients on my own I spent a fair bit of time mulling over which one to pick -- firm or extra firm tofu? Which thickness of rice stick noodle?

Whew. Finally I had all my ingredients gathered together and knew I'd succeeded in picking the right ones when the cashier smiled and asked if I was going to be making Pad Thai!

I was quite pleased with my first attempt which included chicken, tofu (I went with extra firm!), eggs, peanuts, garlic chives, rice stick noodles (I opted for medium thickness), and lots of bean sprouts. I made the sauce from tamarind concentrate (the sour), fish sauce (the salty), hot paprika (the spicy), and brown sugar (the sweet).
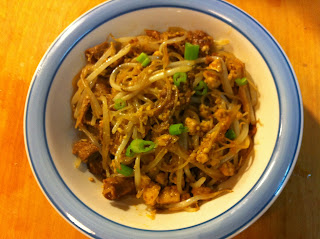
While it was a great meal, it wasn't the same as the take-out place downtown that hubby had recently been to for lunch. So a few weeks later I picked up a carton of their take out (for research purposes, of course!), noted that their noodles were very much thinner, and asked about their mysterious brown sauce which turned out to be not mysterious at all. It was simply hoisin sauce stored in an old sriracha bottle.

More Google-ing yielded another recipe for Pad Thai sauce that incorporated both hoisin and sriracha. I made the meal this time with the new sauce recipe, vermicelli noodles rather than rice stick noodles, thinly sliced beef rather than chicken for the sake of variety, chopped green onions rather than garlic chives since I already had them in the fridge, and I left the peanuts out to be added as a garnish. This new recipe really emulated the take-out place's Pad Thai with the only thing missing being the cardboard take out box!


Pad Thai
recipe inspired by Pim and this one
Serves 2

Sauce 
  • 2 tbsp. fish sauce (or soy sauce)
  • 2 tbsp. brown sugar 
  • 2 tbsp. hoisin sauce
  • 2 tbsp. sriracha sauce 
 Mix the sauce ingredients together. Adjust to taste and set aside.

Other Ingredients -- quantities are approximate depending on what kind of balance you prefer between protein, noodle, and sprouts.
  • vegetable oil
  • ~1 cup thinly sliced chicken, beef, firm tofu, and/or pieces of shrimp (I like to use the meat in the freezer aisle that's already prepped for fondue/hot pot)
  • 1 clove finely chopped garlic
  • 1 egg, beaten
  • ~1 cup rice stick noodles or vermicelli  
  • ~2 cup bean sprouts
  • small handful of garlic chives, Chinese chives, or green onions
  • 1-2 tbsp roasted, unsalted peanuts, gently crushed (you don't want it to turn into peanut butter!)
  • lime wedges  
Directions
  1. Put the dry noodles into hot water and let soak while you prep the rest of the ingredients. You want them to become pliable but not mushy or cooked.  
  2. Add a few tablespoons of oil to a large wok (or frying pan since I don't have a wok) and bring to high heat.
  3. Add the chicken and/or beef, stirring vigorously about 1-2 minutes until half-way done.
  4. Next add the tofu, a tablespoon or two of the sauce for flavor, and the garlic. (Don't add shrimp yet!). Cook for another minute until the tofu is crisp and slightly brown at the edges, adding a bit of extra sauce or oil if the pan is drying out.
  5. Add the drained noodles, and the sauce. Stir rigorously, keep everything moving in the pan/wok, and cook the noodle until soft. Remember to break up the noodle and don’t let it lump together. If the sauce evaporates too quickly and your noodle isn’t quite ready, add a bit of water and keep stirring. Add a bit of oil if the noodle still stubbornly sticks together.
  6. When the noodle is ready (taste it to be sure), push it up to one side of the wok/pan and add the egg into the middle. Let it set for 10-15 seconds and then scramble it up and toss everything all together.
  7. Last, you add the shrimp meat, ground peanuts, and beansprouts. Keep things moving. Add more sauce if it looks a little pale. If you're out of sauce mixture you can just add extra hoisin and/or sriracha to taste. 
  8. When the shrimps are done, shouldn’t take more than a minute, add a handful of green bits (garlic chives, Chinese chives or green onion). Turn the heat off, and quickly give the wok a good stirring to mix everything together.

Jammy Cereal Bars

My kids love cereal bars and asked if I could look up how to make them at home. I happily obliged and found this recipe which looked really simple and used ingredients we already had in the house. There's a fair bit of sugar and butter in them, so I won't be touting them as health food, but on the other hand they are made from ingredients that are all natural which isn't necessarily the case for store-bought individually-packaged jammy cereal bars.


The recipe seemed simple enough - mix the crust ingredients, put half in the pan, spread the jam, top with the other half of the crust mix. What made it a little trickier than expected is that the crust turned out very crumbly even after I pressed it down, so spreading the jam on top didn't work very well. Imagine trying to spread jam on a sand castle. Same idea. So instead I dropped it by small spoonfuls close together and carefully tried to make it as even as possible, but it was still a little messy. Next time I'll try using jam that's less thick, or maybe heat up the jam a little to make it a saucier before attempting to spread it.

The bars were a big hit. We all loved them. Not sure that I'd classify them as a breakfast food since they are pretty sugary, but the kids are looking froward to having them in their lunches for dessert this week, and especially stoked to be able to say that they were made at home!

Out of curiosity I plugged my ingredient list into an online nutrition calculator and then compared with a store-bought cereal bar. The results indicated that if I cut my sheet into 30 bars we'd have the same number of calories, with mine having a higher fat content and less sodium. And with mine having no artificial ingredients or extra packaging. The cost worked out to be a fair bit cheaper than a box of cereal bars, even including the fact that I used a pricier good quality jam.

Jammy Cereal Bars
recipe was altered slightly from this one

  • 3/4 cup brown sugar
  • 3/4 cup butter
  • 1 1/2 cups quick cook oats
  • 1 1/2 cups whole wheat flour
  • 1 tsp cinnamon
  • 1/2 tsp baking soda
  • 3/4 cup strawberry jam

  1. Mix sugar, oats, flour, cinnamon, and soda.  
  2. Cut in the butter to form a crumbly mixture.  
  3. Spread a little over ½ the crumb mixture into 9×13 buttered pan and press down. (I used parchment paper and didn't grease the pan)
  4. Carefully spread with jam, leaving a one inch edge with no jam or it will ooze out the sides.
  5. Add the remaining crumb mixture on top and press lightly into jam. 
  6. Bake at 350F for about 45 minutes.   
  7. Cut into bars, let cool at least a little before eating so you don't burn yourself on hot jam.


Tuesday 12 February 2013

Beef and Barley Stew

This Christmas one of my favourite Christmas gifts from my husband was an Instant Pot. It's a pressure cooker, slow cooker, rice cooker, sauté pan, steamer and stockpot warmer all in one and it's AWESOME! This isn't meant to be an ad for the pot so I'll just say that I totally love it and leave it at that.

I can cook meals quickly and efficiently using the pressure cooker feature, which comes in handy when I only have at most about an hour to get dinner on the table during the week. In the month and a half since Christmas I've already made a number of curries, stews, stocks, and risottos in a fraction of the usual stove-top time!

Most recently I made a very hearty beef and barley stew. It could be easily turned into a soup by adding extra chicken or beef stock at the end of cooking. The grownups of the family enjoyed it and I packed the leftovers for my lunches. Hubby added some sriracha sauce to his portion to spice it up a bit.

The kids on the other hand --who are usually suspicious of dishes where the ingredients are chopped small and all mixed together (since you never know what I might have tried hiding in there!)-- each took the required "no thank you" spoonful to taste, and opted for cheese omelets instead.

Beef and Barley Stew
Inspired by this one and Alton Brown's
  • 1 1/4 lbs lean ground beef
  • 1 (28 ounce) can diced tomatoes (or crushed if you don't like tomato chunks)
  • 2 1/2 cups beef stock 
  • 1/2 cup barley
  • 3 large carrot, sliced
  • 2 stalks celery, sliced
  • 1 large potato, cubed
  • 1 medium onion, diced 
  • 1 clove garlic, minced
  • 1/2 teaspoon dried basil
  • 1/2 teaspoon dried thyme leaves
  • 1/2 teaspoon dried rosemary
  • 1/2 teaspoon dried marjoram
  • salt and fresh ground black pepper to taste

Directions:
  1. Brown the beef in the pressure cooker. Drain off the fat.
  2. Add the tomatoes, stock and barley. 
  3. Close pressure cooker and bring up to full pressure. Pressure cook for 10 minutes 
  4. While the soup is cooking, slice the carrots, peel and dice the potato and onion and mince the garlic.
  5. After the soup has cooked for 10 minutes, use the quick-release and add the vegetables, herbs, and salt and pepper to taste. (I didn't add any extra salt since my stock was already salty.)
  6. Seal the cooker and bring up to full pressure again. Pressure cook for another 10 minutes.
  7. Open using quick release method. 
  8. Add extra heated broth if you'd prefer a soup rather than a stew.

Sunday 10 February 2013

Hash browns, fast food-style!

Since it's cold and snowy outside, I thought I might make some healthy porridge for breakfast and then blog about the rib-sticking high-fiber goodness, all the different grains we have, and what we top the bowls with... but I'll save that plan for another day.

Instead, my kids made a very specific and unusual breakfast request for cheeseburgers and "McDonald's potato patties." (Totally my fault, since I set the kids up with Netflix on my smartphone in bed in order to catch a few more zzz's and they chose an episode of SpongeBob SquarePants. That made them think about eating Krabby Patties with cheese, which of course led to the idea of cheeseburgers for breakfast.) Since it's the weekend and I just bought some ground beef yesterday, I decided to honor their non-breakfasty breakfast request and went googling for a potato patty recipe.


I found a very simple recipe that turned out just perfectly. While it's not exactly a healthy dish given the fact that it is pan fried in a bit of oil, I have no doubt that it came out healthier than if we'd gone to McD's for hash browns!

I did make some small cheeseburgers to go with them but they were eaten faster than I could whip out my phone for a picture!

Hash Browns

  • 1 egg, beaten
  • 4 medium potatoes, peeled 
  • 1 medium onion
  • salt and pepper
  • vegetable oil for frying

Preparation method

  1. Coarsely grate the potatoes and onion into a clean tea towel or strainer and then squeeze out the excess liquid. Place the mix in a large bowl.
  2. Add the egg, a good couple of pinches of salt and freshly ground black pepper. Mix the ingredients well. (You need to salt the mix well otherwise the hash browns can be quite bland).
  3. Heat a good glug of oil in a heavy based frying pan and when the oil is hot (but not smoking), add spoonfuls of the potato mixture into the pan and flatten into patties about 1cm thick. Flip over once browned and crispy - about 2-3 minutes each side.
  4. Serve hot as a breakfast or supper side dish. Especially good with bacon and eggs. Or breakfast cheeseburgers.

Thursday 7 February 2013

Roast Chicken

Last August I decided that we weren't eating nearly enough homemade food. We used to cook a lot in the pre-kids olden days, but life had since gotten pretty busy and hectic and freezer meals from the grocery store and delivery food were so much simpler... and unhealthier... and more expensive... So my new school year's resolution was to start cooking more no matter how busy or rushed we might feel. Here we are about six months later and I've discovered that it's usually just as simple to throw something together from fresh ingredients... and healthier... and cheaper... and also a lot more fun!

One of the first dishes I made at the end of last summer was a whole roasted chicken complete with veggies and potatoes. It turned out beautifully yummy. And when the kids asked where it came from (since no one had rung the door bell to deliver it to our house), I knew I was on the right track!

Since then I've been roasting a chicken about once every two weeks. I love that we get a good meal out of it and still have enough leftovers to make something else like chicken salad sandwiches or chicken fried rice. When I'm feeling like spending a little more time in the kitchen I toss all the bones and some veggies into the pressure cooker after dinner to make some stock.

Sometimes I make the chicken in the pressure cooker using this recipe if we're working under time constraints and my chicken is small enough to fit in the pot. The chicken turns out really moist but not very pretty since I haven't figured out yet how to properly brown the chicken skin in the pressure cooker without all the skin getting blasted off at some point during the pressure cooking which results in a funny-looking naked chicken when the lid comes off. It's still tasty and moist but I serve it on a platter off the bone.

Tonight I made a roast chicken in the oven inspired by Jamie Oliver's recipe. I placed a few bacon strips on top of the chicken during cooking since I already had an open pack in the fridge from earlier this week, and they were the clear highlight of the dish for my kiddos. I think they would have been happiest if I'd just skipped the chicken altogether and simply fed them a half pack of bacon!

Roast chicken
inspired by Jamie Oliver


  • ~2 kg/4lb whole chicken
  • 2 medium onions
  • 2-3 carrots
  • 2 sticks celery 
  • 1 bulb garlic (Yes, a whole bulb, not just a single clove. Garlic is good!)
  • olive oil
  • sea salt
  • freshly ground black pepper
  • 1 lemon
  • 1 small bunch fresh thyme, rosemary, bay or sage, or dried poultry seasoning
     Preheat oven to 400F.
  1. Chop the onions into quarters, the carrots and celery into finger length pieces, and peel all the garlic. Place it all in your roasting pan and drizzle with olive oil. 
  2. Rinse and pat dry the chicken. Rub with olive oil and season with salt and pepper. 
  3. Make many small cuts into the lemon, and then place that in the chicken cavity with the herbs.
  4. Place the chicken on top of the vegetables and put in the oven for about 1 hour 20 minutes. 
  5. After about 30-35 minutes, baste the chicken (or add bacon strips on top like I did tonight!). Also add in some quartered potatoes at this point if you'd like to cook your dinner all in the same pan. 
  6. Give the potatoes and all the stray veggies a stir after another 30 mins and add a little water if the pan is looking dry so things don't burn. 
  7. When the chicken is cooked based on your meat thermometer reading, remove from oven and let sit for about 15 minutes before carving.

Wednesday 6 February 2013

Pita Pizzas

If my family had to pick a single food to eat for the rest of their lives, I think they'd all pick pizza. Coming up with simple and creative ways to make pizza while appealing to everyone's varying tastes is not a difficult task when starting with as blank a canvas as a pizza crust. Or, in the case of tonight, a pack of fresh pita bread.

After last night's cheesy meal I wanted my own pizza to be heavy on the veggies. And since I did my last produce shopping at Costco, I had an excessively large quantity of grape tomatoes on hand. So while I was prepping the rest of the toppings, I was also roasting up my grape tomatoes.

My pizza went into the oven with the roasted tomato mixture and some Parmesan cheese, and then I added a little extra Parmesan once it came out of the oven. 


My kids opted for plain mozzarella cheese pizzas, hold the sauce. One of them added garlic salt on top. My little one loves adding extra seasonings and herbs to her dishes!


Hubby's pizza was light on the sauce and topped with mushrooms, green peppers, kielbasa, and both mozzarella and Parmesan cheeses. He added a sprinkling of olive oil after it came out of the oven.


Pita Pizza

  • pita bread
  • pizza ingredients
  1. Preheat oven to 400F.
  2. Place pita bread on baking sheet and build your pizza.
  3. Bake for 8-12 minutes or until your cheese is starting to bubble and the edges are getting toasty.

Roasted Grape Tomatoes

  • 2 pints grape tomatoes, halved
  • 1 small onion, thinly sliced
  • 2-3 cloves of garlic, thinly sliced
  • 1 tbsp red wine or balsamic vinegar
  • Pinch of salt & twist of pepper

  1. Preheat oven to 375F. 
  2. Mix all ingredients in a bowl. 
  3. Place mixture in a thin layer on a baking sheet covered with parchment paper. 
  4. Roast about 30-40 minutes, stirring gently about halfway through, until veggies are looking lightly browned and smell yummy.

Tuesday 5 February 2013

Cheesy Broccoli Bacon Potato Bake

Very sad news this weekend for a nearby community that the St. Albert Cheese Factory burned down. St. Albert orange mild cheddar is a staple in our house and I occasionally spring for a bag of their cheese curds as well as a snack food for the kids or if we're going to make poutine. Here's a picture of the uniquely Canadian delicacy we made a few weeks ago with homemade fries, gravy from a mix and their fresh cheese curds.


At the grocery store tonight the clerk restocking the St. Albert cheese section said the product was selling very quickly. She said a woman came in just before me and bought over $200 worth of St. Albert cheese since the news reports are saying that it would take about a year for the factory to be up and running again.


So with cheese on my mind and a big bag of broccoli florets in the fridge I decided to go with a simple, yummy, not-so-healthy casserole including many of our favourite ingredients. How yummy was it? So yummy that my kids tried to pick out the bacon and cheesy broccoli bits straight from the cooking dish before their dad got home, and so yummy that there are no leftovers.


Cheesy Broccoli Bacon Potato Bake
adapted from this recipe 


  • 5 slices bacon
  • 1 small onion 
  • 2 cups cubed potatoes
  • 1 head broccoli
  • 2 tablespoons butter
  • 2 tablespoons flour
  • 1 cup milk
  • 1 cup shredded mild cheddar + extra to sprinkle on top if you like cheese. We like cheese.
Directions:
  1.  Preheat oven to 350F.
  2. Fry 5 slices of bacon. Remove bacon, and drain some bacon grease into a clean bowl. Crumble the bacon once it's cool to the touch. 
  3. In remaining bacon grease, fry onions for 1-2 minutes, add potatoes and broccoli, adding back some bacon grease if needed. Saute until fairly tender. Add in the crumbled bacon and remove from heat.
  4.  Meanwhile, in a medium saucepan, melt butter. Whisk in flour, cook for a bit, and then slowly whisk in the milk. While continually stirring, bring to a boil and simmer until the sauce has thickened. Remove from heat and slowly stir in the shredded cheese until it's all melted. Add black pepper to taste. I don't add any extra salt since the cheese and bacon are already both quite salty.
  5. Put the sauteed vegetables and crumbled bacon into a greased casserole dish. Pour the cheese sauce on top.
  6. Bake at 350F for 30-40 minutes. If you're aiming for a super cheesy dish, around the 20 min mark sprinkle on extra shredded cheese.

Leftover Turkey Croquettes

I came across a simple recipe for leftover turkey chili that had good reviews, seemed healthy, and made use of ingredients I already had on hand. So that's what we ate last night. But I won't blog about it here since it wasn't exceptionally yummy. It was just fine. Passable. Shredded mild cheddar and a dollop of sour cream improved it but still didn't take it to the level of deliciousness that would make it a keeper. I'll take the remainder of it for lunches this week but I think I'll be alone in chipping away at the leftovers. It probably would have been better cooked with fresh ground turkey, but it still wasn't great enough to keep the recipe to test out my hypothesis.

So instead I'll share a different really great leftover turkey croquette recipe for that I made a few months back with our leftover Thanksgiving turkey. This is all that was left once I was done cooking since my kids ate them quickly fresh out of the pan. I preferred them with cranberry sauce but the rest of the family liked them plain.


Turkey Croquettes
by Martha Stewart
  • 1 1/2 ounces (3 tablespoons) unsalted butter
  • 1 medium onion, minced
  • Coarse salt and freshly ground pepper
  • 1 1/2 teaspoons minced fresh sage
  • 1 1/2 teaspoons minced fresh savory or thyme
  • 2 cups finely chopped cooked turkey
  • 1/4 cup heavy cream
  • 1 cup mashed potatoes
  • 1/4 cup all-purpose flour
  • 1 large egg, lightly beaten
  • 1 1/2 cups finely ground fresh breadcrumbs
  • Vegetable oil, for frying
  • Cranberry sauce, for serving


Directions

  1. Melt butter in a large skillet over medium-high heat. Add onion, 1 teaspoons salt, and teaspoon pepper. Cook for 3 minutes. Stir in sage and savory or thyme, and cook for 1 minute. Stir in turkey and cream, and cook until liquid evaporates, about 1 minute. Transfer to a large bowl, and let cool for 15 minutes.
  2. Add potatoes, flour, and egg to turkey, and season with salt and pepper.
  3. Drop 2 tablespoons turkey mixture into a shallow bowl of breadcrumbs, turn to coat, and pat into 2-inch disks. Arrange in a single layer on a baking sheet, and refrigerate for 10 minutes.
  4. Heat 1/4 inch oil in a skillet over medium heat. Working in batches, cook croquettes in a single layer until golden brown, about 2 minutes per side. Transfer to paper towels to drain. Serve immediately with cranberry sauce.

Monday 4 February 2013

Chicken and Dumplings

A cold winter weekend afternoon is the best time to make a hearty comfort food that takes a little while to simmer. And with chicken thighs being on sale this week the choice was clear to me. I needed to find a great chicken and dumplings recipe that the whole family would love. And I did!

Our little family of four ate it all up with no leftovers! Next time I make it I'll be doubling the recipe for sure.


Chicken and Dumplings

Serves 4

Adapted from Martha Stewart

  • 3 tablespoons butter
  • 1 medium onion, cut into 1-inch pieces
  • 5 medium carrots, cut crosswise into 1 1/2-inch pieces
  • 1/2 teaspoon dried thyme
  • 1/4 cup all-purpose flour
  • 4 cups chicken broth (or more if needed so there's enough broth for the dumplings to cook in)
  • Coarse salt and freshly ground pepper
  • 1 1/2 pounds boneless, skinless chicken thighs  
  • 2 cups frozen peas

 Dumplings
  • 3/4 cup all-purpose flour
  • 2 tablespoons chopped fresh dill, or 3/4 teaspoon dried dill weed
  • 1 3/4 teaspoons baking powder
  • 1/2 tsp salt
  • 1/2 cup milk (or a bit more if the dough is too stiff)
  1. In a Dutch oven (or a 5- to 6-quart heavy pot with a tight-fitting lid), heat butter over medium. Add onion, carrots, and thyme. Cover and cook, stirring occasionally, until onion is soft, about 5 minutes.

  2. Add 1/4 cup flour and cook, stirring, 30 seconds. Add broth and bring to a boil, stirring constantly; season with salt and pepper. Nestle chicken in pot; reduce heat to medium-low. Cover and cook, stirring occasionally, 20 minutes. Add more broth if needed so that all the chicken is covered.

  3. Meanwhile, make dumplings: In a medium bowl, whisk together 3/4 cup flour, dill, baking powder, and 1/2 teaspoon salt. With a fork, gradually stir in 1/2 cup milk to form a moist and soft batter. It should be just a little thicker than pancake batter and should easily drop from the tip of a spoon. (Add additional 2 tablespoons milk if too thick.) Set aside.

  4. Stir frozen peas into pot. Drop batter in simmering liquid in 10 heaping tablespoonfuls, keeping them spaced apart (dumplings will swell as they cook). Cover, and simmer until chicken is tender and dumplings are firm, 20 minutes. Serve.

Granola

With two large bags of oats that I bought on sale the other week sitting in my pantry, we sat down to brainstorm on what else we could make aside from oatmeal porridge and oatmeal chocolate chip cookies.

And then my kids came up with the idea of granola! It's something I've never made before, (in fact I don't think I've even bought granola in recent years), but given their fond memories of the granola they were served at their old school we decided to give it a go. A quick Google search led me to The Best Granola Recipe, so needless to say our expectations were high. Plus I already had most of the ingredients in the house and enough time to pull it all together. My 4 year old volunteered to be the mixer and I just measured everything out for her.

It was so simple to make and turned out to be indeed the best (and only!) granola we've ever made!


Granola

Makes about 2 pounds (1kg)

Adapted from David Lebovitz who adapted from Feast, by Nigella Lawson

  • 5 cups (450g) quick cook oats
  • 3 cups (375g) almonds, coarsely chopped
  • 1 cup (125g) sunflower seeds
  • 3/4 cup (100g) untoasted sesame seeds
  • 1/2 cup (120g) packed light brown sugar
  • 2 teaspoons ground cinnamon
  • 1 teaspoon dried ground ginger
  • 1 teaspoon sea salt
  • 3/4 cup (180g) unsweetened applesauce (or another unsweetened fruit puree)
  • 1/3 cup (100g) maple syrup (the original recipe calls for rice syrup)
  • 1/4 cup (80g) honey
  • 2 tablespoons vegetable oil
 Preheat the oven to 300F (150C).

1. In a very large bowl, mix together the oats, almonds, sunflower and sesame seeds, brown sugar, cinnamon, ginger, and salt.

2. In a small saucepan, warm the fruit puree with the maple syrup, honey, and oil.

3. Mix the fruit mixture into the dry ingredients until thoroughly dispersed, then divide and spread the mixture evenly on two baking sheets. (If you have ones with sides, often called jelly-roll pans, use them.)

4. Bake the granola for about 45 minutes, stirring every ten minutes, until the granola is deep golden brown.

5. Remove from oven, then cool completely.

Store the granola in a large, airtight container. It will keep for up to one month.